
TL;DR: The agent explores the app first, a person approves the journeys and the cases, and the agent runs them through CodeDroid MCP and reports with screenshots. A bug counts only if it fails the same way twice.
To get started:
- Turn on USB debugging, plug in the phone, and install CodeDroid MCP:
npx -y @codedroid/mcp setup - Open the app's repository in Claude Code, Codex, or Gemini CLI, restart it, and ask: “Test this app end to end on my phone.”
1. What Is MCP E2E Testing?
MCP e2e testing means a coding agent runs an app's end-to-end test cases on a real phone, through Model Context Protocol tools, and reports what it saw. This guide is for Android teams that build with an agent such as Claude Code, Codex, or Gemini CLI and still test each build by hand.
Development with coding agents is becoming recursive: the agent writes a change, checks it, and writes the next change from what the check found, often for many rounds before a person looks. The output can only be as good as the check. An agent that can only read its code converges on code that reads well. An agent that can watch its code run converges on code that works.
Today the check is mostly another reading of the code, such as a second model reviewing the diff, plus unit tests. On Android that misses what users meet first: the wrong label, a keyboard over the button, a dialog that never opens, a crash on a real account's data. So the developer installs the build and taps through it by hand, and every round of the loop waits on a person.
We think the better fix is to give the agent hands. MCP is an open standard that lets an agent call external tools, and CodeDroid MCP's tools read and drive an Android phone: get_screen, tap, type_text, wait_for, take_screenshot, plus install_apk and adb for builds and logs. The agent that wrote the code can then open the app, tap through a flow, and check the screen against what was expected.
This is not testing an MCP server, and it is not asking an agent to "try the app and see if anything looks wrong". The journeys and cases are written down in markdown, reviewed by a person, committed with the code, and run the same way each time. The agent is the test runner, and the documents are the test suite.
2. Benefits of MCP E2E Testing
Teams that already have unit tests and an instrumented suite may reasonably ask what another layer adds. The benefits fall into three groups.
(1) Tests Written the Way a User Sees the App
A scripted UI test is tied to implementation details: resource IDs, view matchers, idling resources, test tags. When a screen is rebuilt in Compose or a button moves into a menu, the test breaks even though the user's journey still works.
An MCP test case is written the way a QA engineer would describe it: tap "My skills", search for the item, check that "Use Skill" is disabled until every blank is filled. The agent finds controls by the words on screen or by their content description, which is also what a user and a screen reader rely on. A layout refactor that keeps the labels leaves the case intact, and a label that changes is a one-line edit in a markdown file.
Because the cases run on a real phone with a real account, they also meet conditions an emulator with a fresh profile rarely shows: existing data, first-run sheets, system permission screens, content that loads a moment after a tab opens.
(2) Test Documents That Live With the Code
Everything the workflow produces sits in an e2e/ folder at the root of the app's repository:
EXPLORE.md, a map of the app's screens and exact labelsPRD.md, the scope and release criteria of the test effortCUJs.md, the critical user journeysTESTCASES.md, the runnable casesreports/<date>/, one report per run, with screenshots
These are ordinary files. They are reviewed in pull requests, versioned with the code they test, and readable by anyone on the team, including people who do not write Kotlin. A product manager can read CUJs.md and say that a journey is missing. A new engineer can read EXPLORE.md and learn where every screen is.
(3) Lower Cost of Writing and Keeping Tests
Writing end-to-end tests is slow, and keeping them current is slower. Here the agent does the first draft of each document from the source code and the running app, and a person reviews it. When the UI changes, the agent can check the source history for the renamed label, walk the journey on the phone, and propose the updated case.
There is a trade-off. An agent reading each screen is slower than an instrumented test, so this layer does not replace unit tests or a fast CI suite. It fits the part of testing that is still mostly manual: the pass before a release, the check after a risky change, the reproduction of a reported bug.
3. The CodeDroid MCP Workflow
CodeDroid MCP ships its e2e workflow as a set of agent skills. A single skill, app-e2e, runs five steps in order, each of which is its own skill and writes one document:
Explore → Test PRD → CUJs → Test cases → Run and report
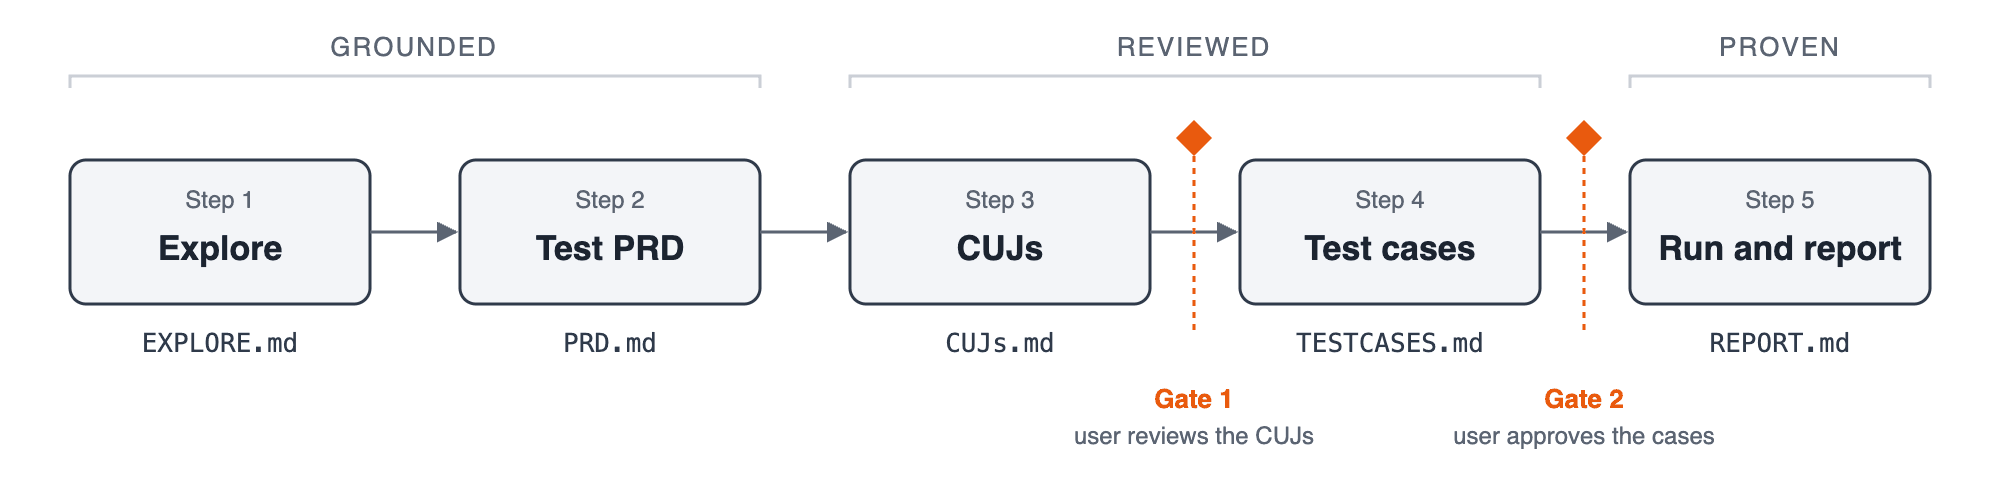
app-e2e workflow: five steps, the document each one writes into e2e/, and the two points where it stops for a person's approval.Source: CodeDroid MCP, app-e2e skill
The steps fall into three stages. Each stage answers a different question: what does the app actually show, what should be tested, and does it pass.
3.1 Grounded: Explore the App and Define the Scope
Agent-run tests often fail on a guessed label while the app works fine. The agent assumes a button says "Save" when it says "Done", and the case fails as not found.
The first step, app-e2e-explore, exists to remove guesses. Before touching the phone, the agent reads the app's documentation, its manifest, and its UI source, collecting every visible string and content description, including the ones only some states show: an error, an empty list, a dialog. It then walks each screen on the phone, read-only, and records in EXPLORE.md:
- the way into each screen and the way back
- each control's exact selector, and whether it is text or a content description
- traps, such as a selected tab that is not clickable or a keyboard that covers the tab bar
- controls one tap from harm: delete, clear all, sign out, purchase
- the account state the tests will meet
A label that was not seen on screen or in the source is marked as a guess.
The second step, app-e2e-prd, writes a short test PRD. It is a PRD for the test effort, not for the app. It states the release question the run answers, the journeys in scope, the non-goals, numbered requirements, and release criteria. It also sets the priority scale used everywhere after:
- P0: a new user is blocked or loses data
- P1: a main journey is degraded
- P2: everything else
Each journey also gets a run mode. Some can be driven directly on the phone. Some need CodeDroid's own agent to run a task. Some stay manual because they need a wiped device, a second account, or a real payment. Manual journeys remain in the plan, with the reason, so the report can say what was not covered.
3.2 Reviewed: Journeys and Test Cases a Person Approves
The third step, app-e2e-cujs, writes the critical user journeys. A CUJ is titled with the user's goal, not the screen, and lists the outcomes someone can see on the phone, with the exact words in quotes. "Works correctly" is not an outcome. The file ends with a coverage table that maps each PRD requirement to the CUJs that prove it, so a requirement with no journey is visible as a gap.
Then the workflow stops. This is the first of two gates:
Gate 1: the user reviews the CUJs. Gate 2: the user approves the test cases.
The agent does not write test cases in the same turn. A person approves or edits the journeys first, and the file records that approval on its first line.
The fourth step, app-e2e-testcases, turns approved CUJs into cases. Each case has a start state, steps by exact label, expected outcomes, and a cleanup. This one, from the skill's own documentation, tests a saved skill in the CodeDroid app:
### TC-12a · P0 · Use a skill with a blank: the prompt lands in the composer, not sent
Needs: TC-10 (makes e2e-timer)
Start: Chat, a new empty session.
Steps:
1. Tap the Skills tab (`content_description` "Skills"), then "My skills".
2. Tap "Search my skills", type "e2e-tim", tap "e2e-timer".
3. Check "Use Skill" is disabled; tap "Minutes", type "1"; tap "Use Skill".
Expected:
- The composer shows "Open Clock and set a timer for 1 minutes".
- No "Working" row: nothing was sent.
Cleanup: clear the composer.
The case names the tab by its content description because the tab is an icon, searches for the item because a long list hides rows, and states what must not happen as well as what must. Several rules in this step came from cases that failed for the wrong reason:
- Find list items by searching, not scrolling, because long lists hide rows.
- Wait for content that loads after a screen opens.
- Assert on a result row, not on the text that was just typed into a search box.
- State which other case a case depends on, so it does not fail when run alone.
Other rules keep the run safe on a phone that holds real data:
- Everything a case creates is named
e2e-...and removed by the case that ends with it. - Nothing that sends, buys, posts, publishes, or deletes data the cases did not make.
- The agent never signs in, types passwords, or pays. The user picks the account.
The second gate follows: the user approves the cases, and separately approves any case that makes CodeDroid's own agent run a task.
3.3 Proven: Run on the Phone and Report With Evidence
The fifth step, app-e2e-run, runs the approved cases. Before the run, the agent checks that the phone is connected and unlocked, reads the installed build so the report names exactly what was tested, and clears the crash log so any crash read later belongs to this run.
For each case, it puts the app in the start state, follows the steps, checks every expected line against the screen, saves a screenshot of the end state whether the case passed or failed, runs the cleanup, and reads the crash log again. A new crash line for the app fails the case.
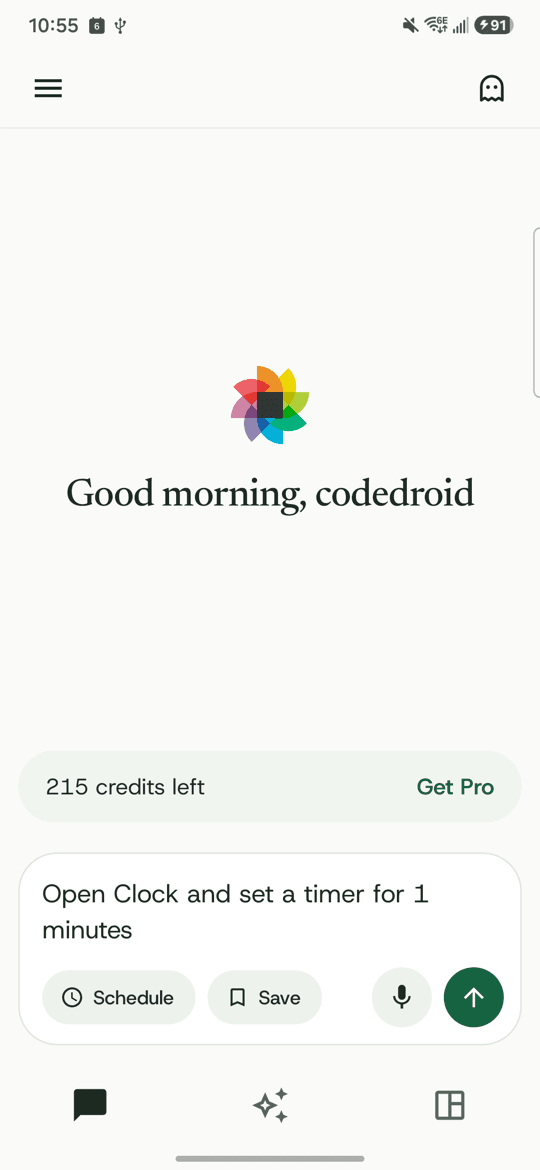
Source: CodeDroid e2e run, November 2026
When a case fails, the agent classifies each failure before reporting it:
- A test bug: the case assumed a label that is not there, or checked too early. The case is fixed and rerun.
- The environment: data the test did not make, a different build, a dropped connection. The state is restored and the case rerun.
- An app finding: the app shows the wrong thing, and does so again on a rerun.
Only the third class is reported as a bug. A finding is a case that fails the same way twice, with evidence the agent has read. A case that fails once and then passes is treated as flaky and investigated, not counted as green. For each finding, the agent looks for the root cause in the source and asks before fixing anything.
The report, e2e/reports/<date>/REPORT.md, contains the build, device, and date; counts of passed, failed, and not run; every case with its result and screenshot; each finding with its evidence; what was not covered; and the answer to the release question from the PRD.
One question is useful to ask of any such report:
Could someone who was not present decide whether to ship from this report alone?
After the First Run
Once e2e/ exists, three more skills cover the everyday work:
app-e2e-rerunruns part of the suite: specific cases, one journey, every P0 as a smoke test, the cases that failed last time, the cases a code change touches, or the same cases on two builds.app-e2e-bugturns a reported bug into a case that fails on the current build and passes once the bug is fixed, then stays in the suite as a regression test.app-e2e-maintainupdates cases after the UI changes, retires cases for removed features, and lists the journeys and requirements that nothing tests.
This is where the recursive loop from the opening closes. The agent changes the code and builds it, install_apk puts the build on the phone, and app-e2e-rerun runs the cases the change touches plus every P0. A case written by app-e2e-bug is the clearest example: it fails on the current build, the agent fixes the source, and the same case must pass twice on the fixed build. Each round starts from what the phone showed.
The loop is closed for checking, not for deciding. A person still approves the journeys and the cases, the agent asks before fixing a finding, and a changed case is shown to the user before it counts as approved.
What the Approach Does Not Do
A few limits follow from driving a real phone through accessibility:
- Toasts disappear before they can be read, and long on-screen text is cut at 120 characters.
- A phone shared with other people or agents can change between steps, so the agent rereads the installed build after every pause.
- Journeys that need a fresh install, a second account, or a real payment stay manual.
- Saving screenshots and reading crash logs use
adb, which needs Android platform-tools and a USB or wireless debugging connection.
4. How to Get Started
A common mistake is to start by asking the agent to write test cases. Cases written before the app has been explored are built on guessed labels, and cases written before the journeys are agreed test whatever the agent found interesting. A more practical path has two steps:
- Connect the phone and confirm the agent can see it
- Run one full pass on a small scope
Step 1: Connect the Phone
CodeDroid MCP needs Node.js 20 or later and an Android phone. The phone and the computer can be on different networks.
The quickest setup is over USB, which needs adb from Android platform-tools on the computer. With USB debugging turned on and the phone plugged in, one command adds CodeDroid to the coding clients it finds, installs the CodeDroid app on the phone, and pairs the two:
npx -y @codedroid/mcp setupIt supports Claude Code, Codex, Gemini CLI, Cursor, VS Code, Claude Desktop, and Windsurf. On the phone, the user allows USB debugging, signs in to CodeDroid, and taps Allow when the computer first connects. While a computer acts on the phone, CodeDroid shows its name and a Stop button. Without a cable, the phone can be paired with a one-time code from CodeDroid → Settings → Computers → Pair a computer.
The e2e skills come with the plugins for Claude Code, Codex, and Gemini CLI. The other clients get the MCP tools only, so the workflow in this guide assumes one of those three.
After restarting the coding client, a first request confirms that the connection works:
Read the screen on my phone and describe what is open.
Step 2: Run One Full Pass
There are two ways to run the first pass.
Option 1: Run It Yourself
With the app's repository open in the coding agent and the build under test installed on the phone, the whole workflow starts from one request:
Test this app end to end on my phone.A few choices make the first pass more useful:
- Keep the scope small. One area of the app, with five to ten P0 journeys, is enough to learn how the gates and the report work.
- Review the CUJs carefully. The first gate depends on a person's knowledge of the product; a wrong journey produces well-run tests of the wrong thing.
- Read the failures by class. Test bugs and environment problems in a first run are normal, and each fix makes the suite more stable.
- Commit the
e2e/folder. The next run, by anyone on the team, starts from the approved documents and does not repeat the exploration.
Option 2: Testing Services
Teams without the time to set this up, or that want a second opinion on their journeys and release criteria, can work with CodeDroid. We offer an app testing and evaluation service that covers the same ground: exploring the app, agreeing the critical user journeys, running the cases on real devices, and delivering a report with evidence.
Either way, the suite then grows with the app: a smoke run of the P0 cases after a risky change, a new case for each reported bug, and a full run before a release.
5. Conclusion
End-to-end testing has always been the layer closest to what users experience and the most expensive to keep. MCP changes the cost side: an agent that can read and drive a real phone can draft the journeys, write the cases, run them, and collect the evidence. It does not change who decides. The workflow described here keeps a person at the two points where judgment matters, what to test and whether the cases are right, and makes the agent accountable for the rest through screenshots, crash logs, and a rule that a bug must fail twice before it is reported. That is what makes recursive development workable on Android: the agent's next round starts from evidence, and a person's attention goes to the decisions.
Explore → Test PRD → CUJs → Test cases → Run and report
The order is the point. Exploring first means cases fail less often for the wrong reason, and the two approvals mean they check what the product is supposed to do. The report then has to stand on its own for someone who did not watch the run.
The most practical way to begin is with one area of one app. Connect a phone, run a single pass, read the report, and decide from there how much of the release checklist the agent can carry.
References
- CodeDroid MCP on GitHub
https://github.com/codedroid-team/codedroid-mcp - CodeDroid MCP overview
https://www.codedroid.com/mcp - Install CodeDroid
https://get.codedroid.com - @codedroid/mcp on npm
https://www.npmjs.com/package/@codedroid/mcp - Model Context Protocol
https://modelcontextprotocol.io - MCP Registry
https://registry.modelcontextprotocol.io - Android SDK Platform-Tools (adb)
https://developer.android.com/tools/releases/platform-tools